Friday, December 21, 2012

Heading into the home stretch

With a hard commitment to start whaleboat number two in early January, we are working diligently to finish the relatively few remaining tasks on the first boat.  The fussy process of installing the thwart knees and spacers is almost done.  Only 4 remain out of the total of 14, and they should be done within the next few days.  The oarlock pads are bedded and screwed down.  The rudder parts have all been milled and cut out of white oak, fitted to the boat, and are ready for the installation of pintles and gudgeons.  Then the rudder cheeks can be attached.  After that, most of what remains is finishing, which will be part paint and part oil.
John and Bob test fit a knee and spacer
All fitted, bedded, and ready for riveting
One of five oarlock pads bedded and screwed
The Marsh Cat got her hull covered with a layer of carbon fiber fabric this  week.  A couple of coats of epoxy were applied and sanded, followed by primer.  The waterline was marked using a laser level.  She is now ready for painting, and then turning over to begin the needed interior work.
Marsh Cat hull covered with carbon fiber and painted.  Note penciled waterline.
Laser level used to mark the waterline on Marsh Cat Obadiah.
Bob is making progress on the Herreshoff Meadow Lark, Suzy.  Cutting of the bulkheads has been completed, and a step for the mainmast compression post has been fashioned.  
New bulkhead configuration shows the new "open" floorplan.
New mast step for mainmast compression post.

Friday, December 14, 2012

Whales: Beware!

The main attraction in the shop these days is definitely the whaleboat replica.  Newt is commanding a veritable army of volunteers as the boat nears completion.  Thwart knees continue to be installed, rubrails and outwales are being fastened, and the many components that made these vessels effective whale killers are being riveted and screwed in place.  We hope to finish this boat in the next few weeks, and plan to lay the keel for the next one in January.

The job of fabricating and fastening knees is a lengthy and fussy and time consuming one. As noted previously, it involves steam bending kerfed and tapered white oak strips, forcing each one into its place along the appropriate thwart, scribing and cutting a pine insert between the knee and the adjacent planks, and fastening the whole thing together with copper rivets.  There are one, and sometimes two knees on each side of each thwart, and with so many thwarts to do, the process does drag on. 

While the original whaleboats were built to last only one voyage, we want this boat to be around for a good long time. Therefore, in addition to using exclusively non-ferrous fastenings, we are taking extra steps to avoid water infiltration.  All places where wood contacts wood are primed or sealed, and the bedded with Dolphinite.  While it is messy and takes more time, it will produce a better, and longer lasting end product.  These steps are being done with thwart knee installation as well as all other component installation on the boat.
Steam bent knee clamped in position on thwart prior to riveting 
Volunteer Carl works on knee installation.
With the completion of the bow chock installation, it became possible to install the adjacent outwale, and volunteers Steve and Lee worked on this.  Again, they sealed the mating surfaces of the sheer plank and the outwale, and bedded with Dolphinite before screwing the outwale in place.
Steve and Lee finish up the outwale installation on the starboard side.


The completed pow assembly on the portside
Having completed the bow chock installation, volunteer Charles moved on to installing the cleats that sit atop the gunwale aft of the bowchocks.  These had been fabricated earlier this year and set aside and we were finally ready to bed and copper rivet them in place.
Charles' completed installation of  cleat on starboard side.  Port cleat is clamped in place awaiting riveting.
Next up were the oarlock pads.  Again, they had been fabricated and set aside months ago.  Charles positioned each of the 5 pads, per plan, 12 1/4 inches aft of each thwart, alternating port to starboard.
Oarlock pad clamped in position.
While most of the action was at the whaleboat station in the front of the shop, lots of other activity was also taking place on other boats.  Bob has gotten to work on the Herreshoff Meadow Lark, Suzy, making some of the cabin changes requested by the owner.  He will be adding a compression post beneath the mainmast, to replace a keel to roof bulkhead that has more-or-less supported the mast heretofore.  Much of that bulkhead will be removed in order to allow better use of the belowdecks space.
Bob works on removing bulkhead sections in Suzy's cabin.
A 2x4 stands in for the compression post to be.
Bruce continued work on the Marsh Cat Obadiah, prefitting carbon fiber fabric over the beautifully faired hull.  Carbon fiber was chosen because, even though it is more expensive than glass fiber, it will be stronger, stiffer, and considerably lighter, once installed.
Bruce positions the carbon fiber fabric.
All ready for the bedding coat of epoxy
Meanwhile, another coat of epoxy has been applied to the stitch and glue Chesepeake Light Craft (CLC) crew rowing dory built by Bruce and Nick.  Volunteer John sanded and vacuumed the interior, and she is now ready for the first coat of varnish.  CLC has posted some construction photos of Bruce, Nick, and others working on the build.
John finishes up the pre-varnish vacuuming of the CLC rowing dory.

Friday, December 7, 2012

The Elephant in the Room

It's difficult to ignore the newest arrival on the WoW shop floor.  She is a 36' Francis Herreshoff designed Meadow Lark sharpie.  While she has been at the ISM dock since October, and we have all gotten used to seeing her, she looks much bigger inside the shop.  Water does, indeed, shrink boats.  

Moving her the few yards from the dock into the shop was a multi-day adventure, beginning with running her up river to Riverton, NJ. to be hauled, and then trucked across the river and south, back to WoW.  From there, tricky maneuvering by Jeff, Bruce, Newt, and a host of volunteers resulted in her reaching her present location, ready for repairs and rehabilitation.
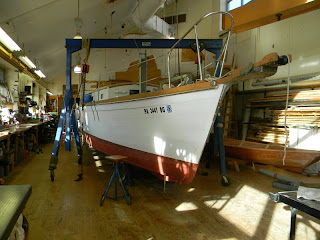
36' Herreshoff Meadow Lark sharpie is a real presence on the shop floor.
Needless to say, the Meadow Lark will be a center of attention in the shop in the weeks ahead.

Sometimes you get to feel like the "shoemaker's children" working at WoW.  Spending every hour working on building and fixing stuff for others, and never doing anything for yourself, but thanks to some considerable effort by staff and volunteers, we now have a brand new top on the long work counter on the south side of the shop.  Having gotten 17 years of hard use out of the old one, replacement was certainly due.
New bench top -- shiny and smooth
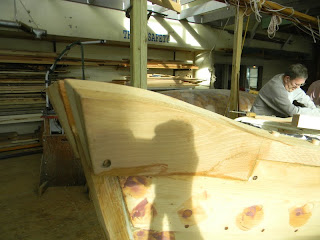
Work continued in earnest on the Beetle whaleboat replica.  Newt and volunteers Lee, Steve, and John got well into the process of installing knees on each of the thwarts.  This is a time consuming process (aren't they all) involving steam bending oak to almost a 90 degree curve, fitting it, and then scribing and cutting a cedar backer between the oak and the inner surface of the planks.
Newt clamps an oak knee in place
Adjusting the knee for the perfect fit.
Lee primes a thwart prior to bedding a knee.
At both ends of the whaleboat, work was taking place as well.  At the stern, Charles fitted the loggerhead through the lion's tongue, and beveled its bottom so the loggerhead would sit level with the waterline.  Also, the ceiling was notched where the shaft of the loggerhead is inserted.
Cutting the bevel on the loggerhead base
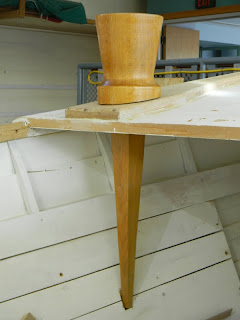
Loggerhead shaft let into ceiling.
Loggerhead set into lion's tongue for strength and rigidity.
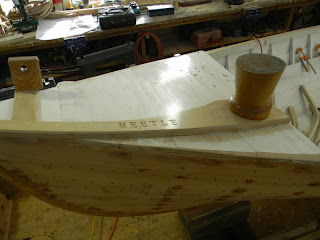
On the other end, the bow chocks were finally bedded and fastened in place.  These mighty oak chocks were used to hold the position of the harpoon line once the whale was harpooned.
Bow chocks bedded, screwed, and bunged.

Bow chocks from the side.

Meanwhile, the Marsh Cat was not being ignored.  Bruce did his final fairing and sanding on the bottom in preparation for the application of a layer of fiberglas over the repaired bottom.
More fairing, more sanding.